Caustic Tank and Hand Stripping for your Wood Doors and Furniture

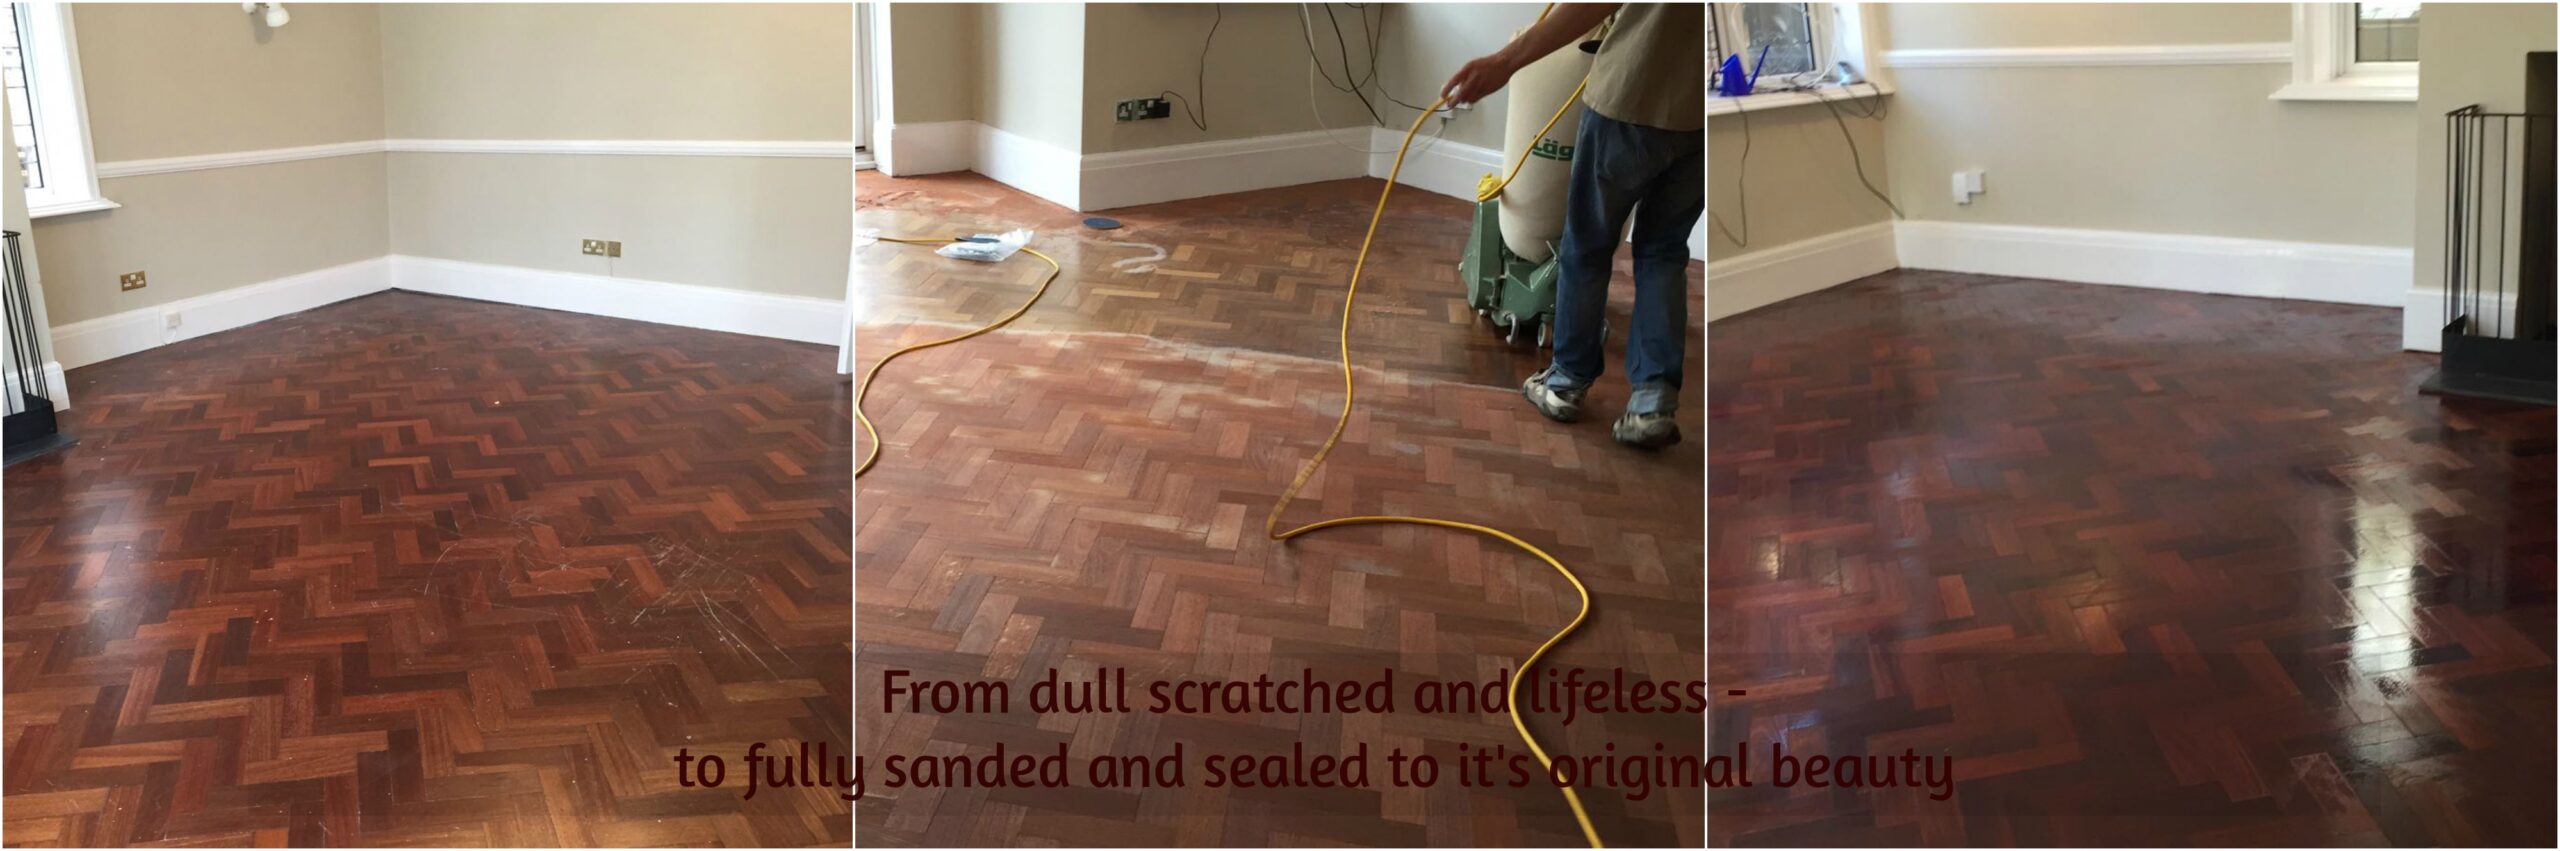
A Caustic Tank is the most commonly used method to strip paint from wood doors and furniture.

Many people assume a stripping tank is an acid bath, it is totally the opposite; caustic soda is an alkaline.

We use a Hot Caustic Tank – the hot tank can be used for both wooden items and metalwork.

The heating of the caustic soda speeds up the stripping process, which makes the wood time in the solution less.

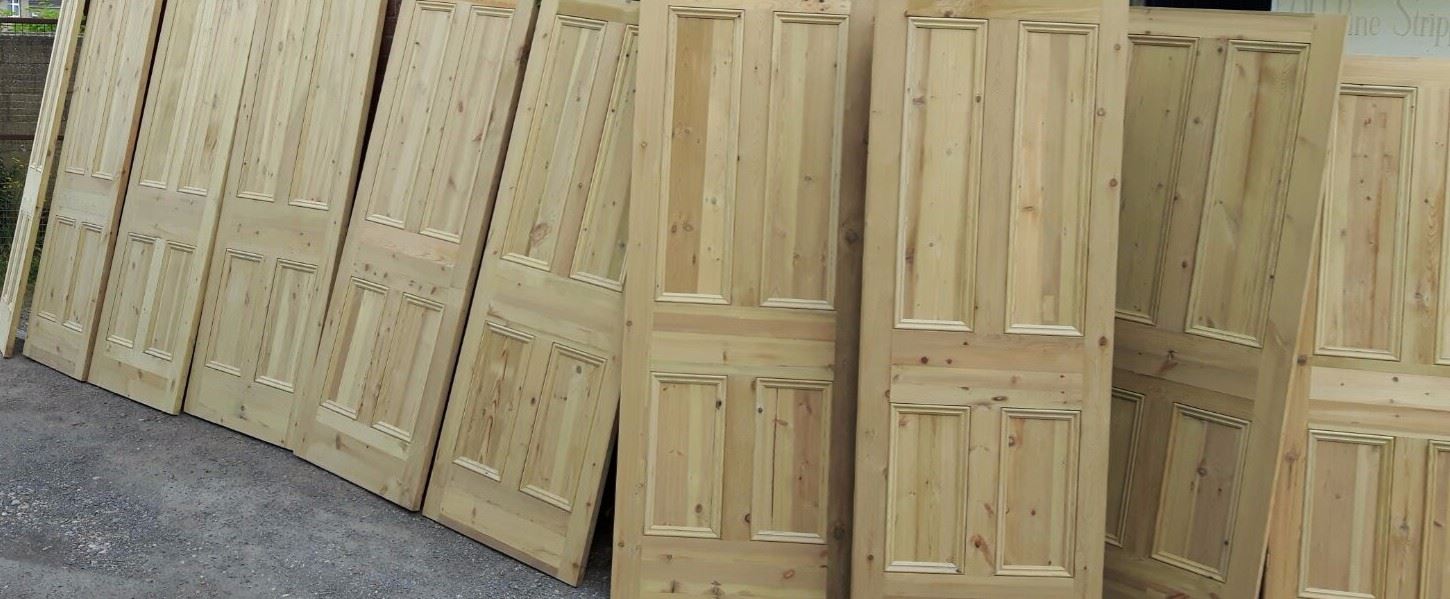
Pine doors, windows, furniture, and woodwork strip really well, but these must be done in a hot tank, or there is a good chance the items will be damaged.

Sometimes furniture and doors are better served by a hand strip which is a chemical hand strip and heat gun.

If doors are to be repainted, they should ideally be hand stripped, so that any areas of the door which have sections that potentially could soak up caustic due to the cut of the grain, will not be ruined by the caustic. This is not impossible to repair if it happens, but it is incredibly time consuming and costly. This is something that is likely to happen and if you are repainting doors, then a hand strip is highly recommended at all times.


WhatsApp Image 2016-09-05 at 09.55.38 WhatsApp Image 2016-09-05 at 09.55.50

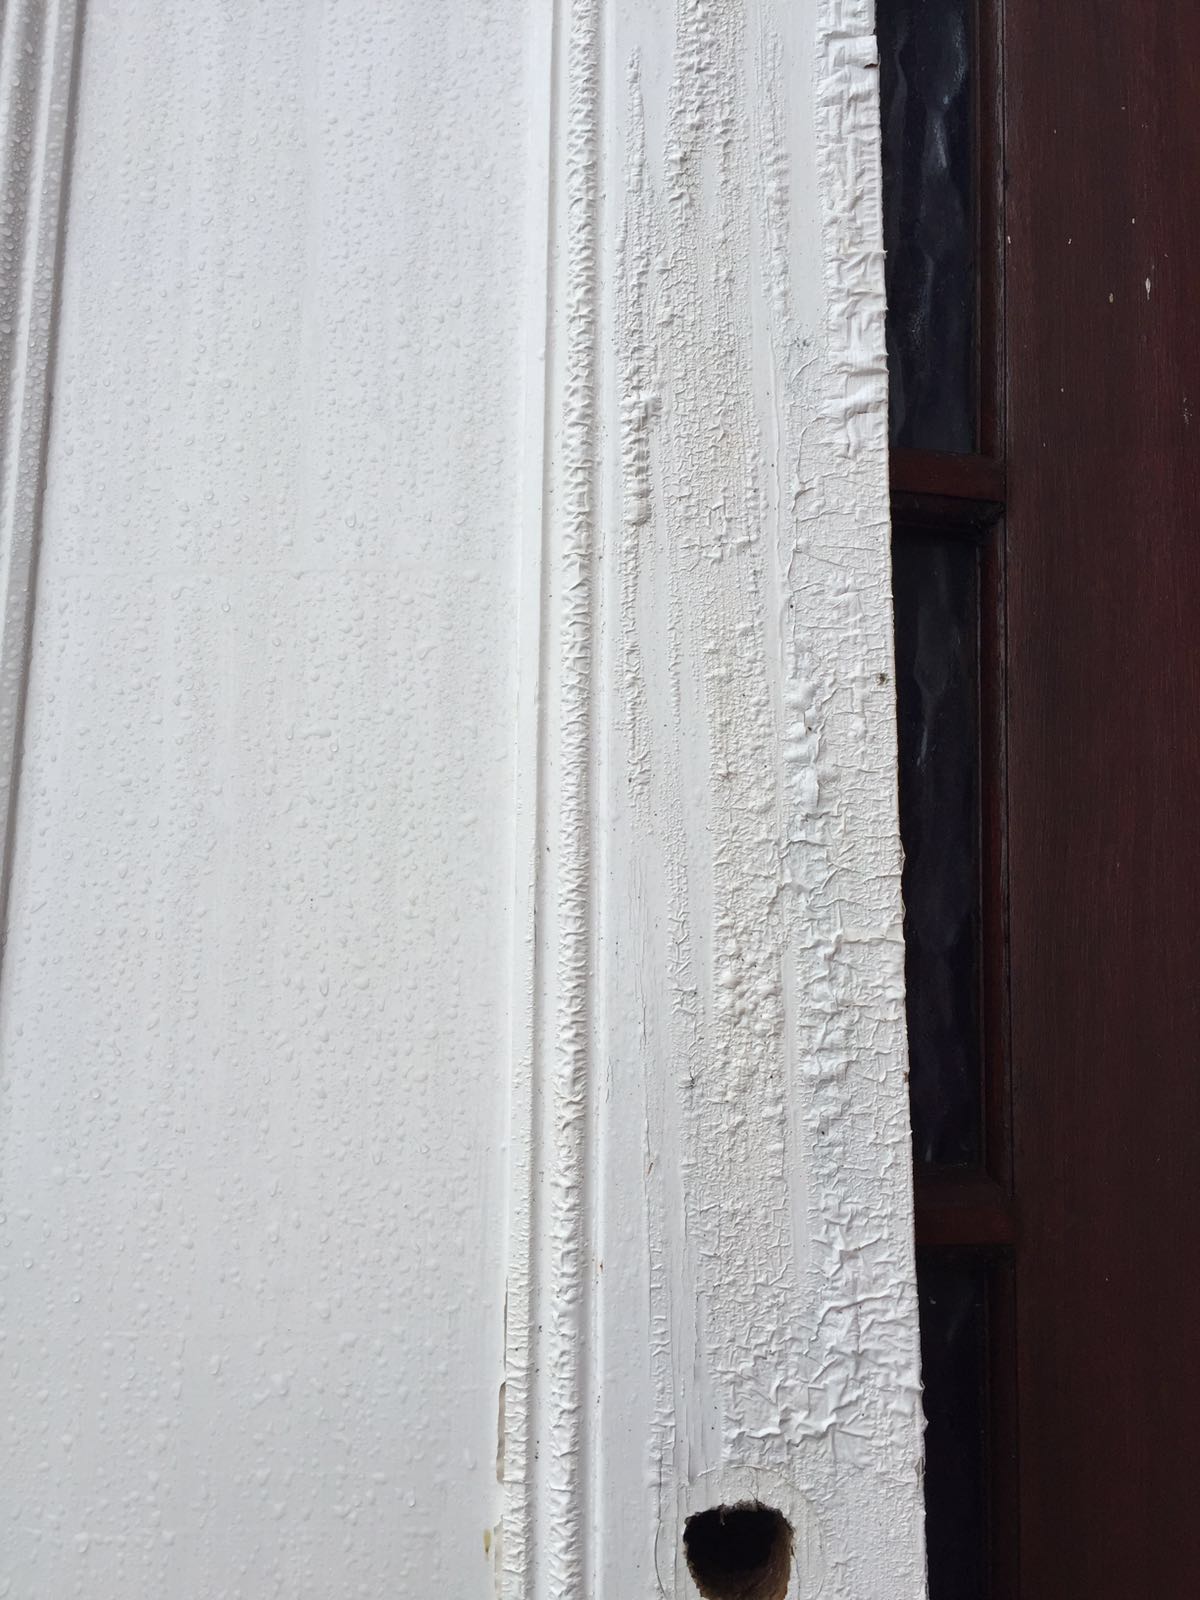
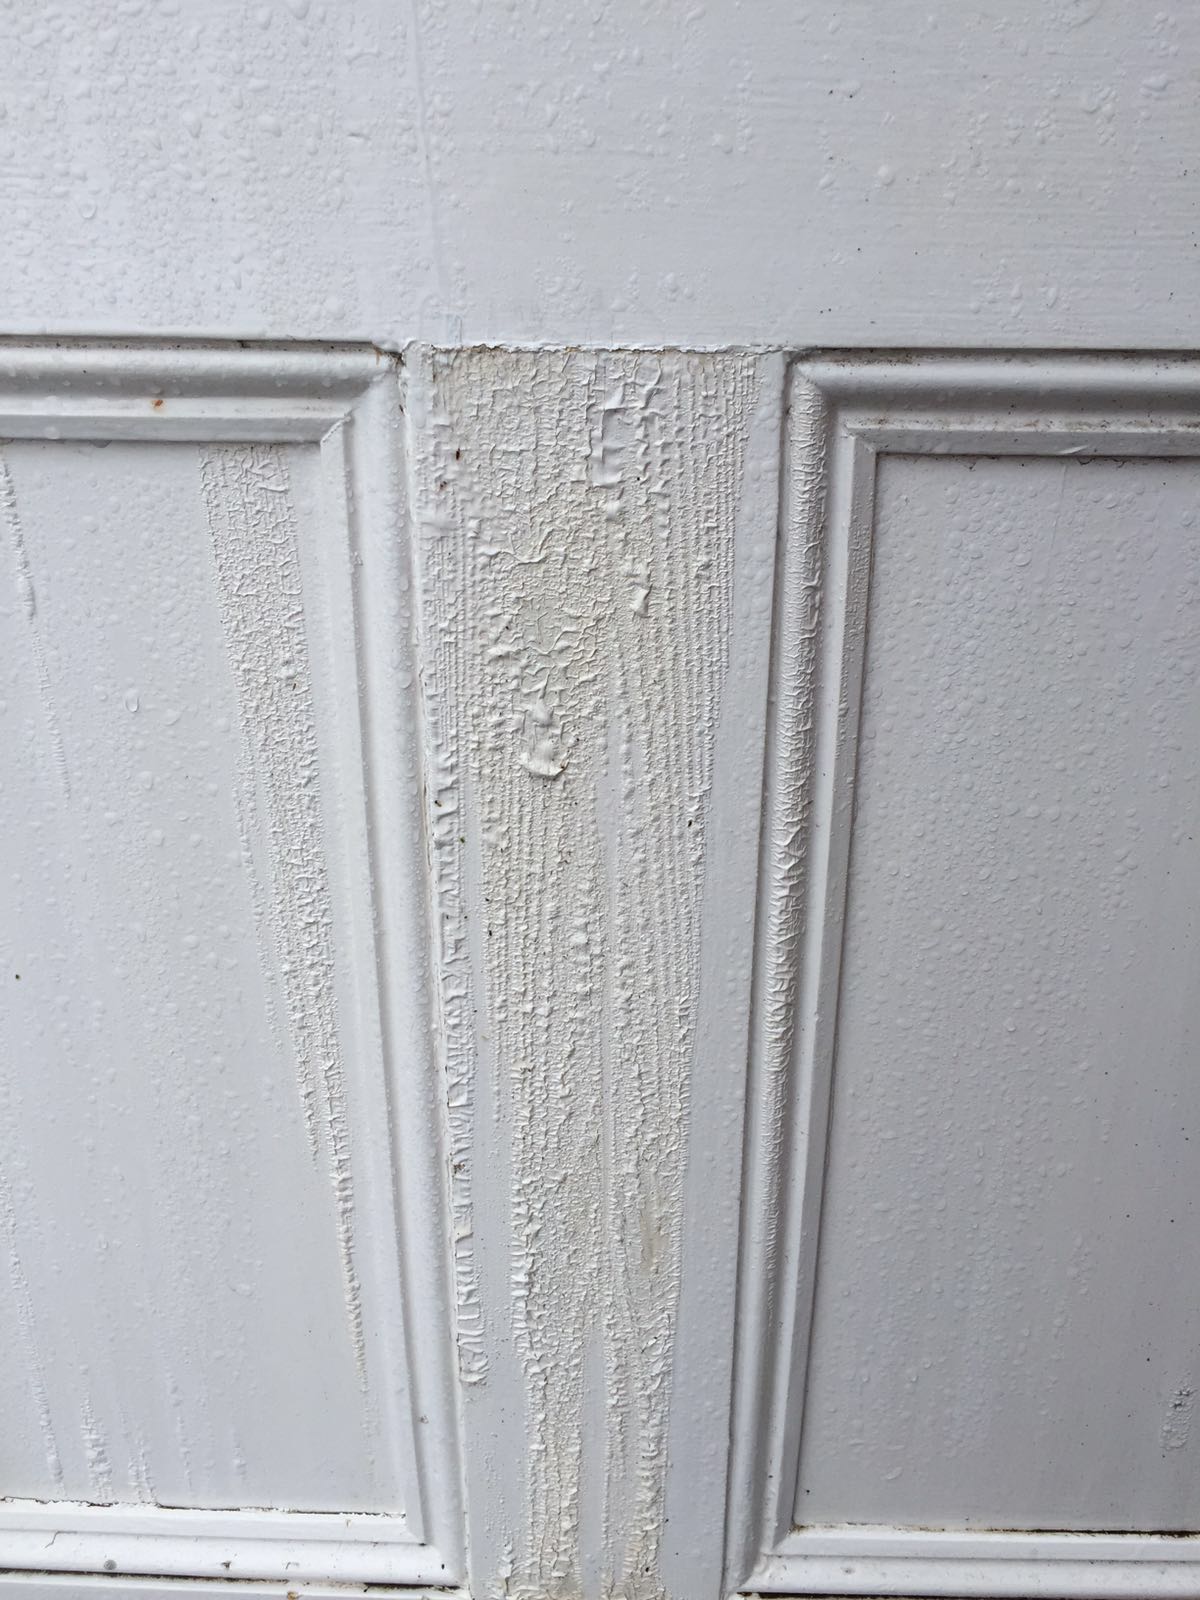
These doors were put into a tank and the caustic was soaked into the open areas of grain. If repainting, doors need to be hand stripped and a reputable stripping company will advise this.

Tank stripping of furniture – the issue lies in the construction where they were glued with animal glue, and these can come off through the temperature of the liquid which loosens the joints. You hear horror stories about wood stripping, but to be honest if it was that bad, why would you have hundreds of antique dealers up and down the country using our services? It really is about correctly choosing your service provider.

13174014_1175584475794217_4410010525929424305_n

To have a good paint stripping tank, it must be kept fresh and really hot which here at PERIOD PROJECTS we do and have done for the last 20 years, and this costs a lot of money, then the doors aren’t in the tank for long periods at a time. We are not the cheapest and this is why.

When you get a recession it seems a few cowboys set up tanks in unknown locations and run mobile services, and you have no idea where your items are going. After a while the caustic is old, he’s getting a bad name and not much work coming in, and can’t afford to heat the tank properly so the doors are submerged in the tank for half a day or even more, and the doors are ruined. At the end of the recession, they get back in their van and are gone, and we’re left with “doesn’t it loosen the joints and warp the doors”.

So always use an established company with some history.

Understanding Architectural Periods and styles for builders and Developers

Get the Right Detail for your Chosen Era

Understanding how to get the detailing right for your chosen Period style is an absolute necessity, with many developers and builders who believe traditional style is still worth maintaining.

It is surprising just how many house builders and developers, both private and commercial, manage to get it so wrong. The common sins are either using details that are out of keeping with the era of the design, or attempting to save money on prominent features. The doors, both Interior and Exterior, are of the utmost importance in this process.

Thankfully it is not always necessary to spend a fortune to achieve a perfect traditional house. There are areas where significant savings can be made without compromising on the finished result.

We here at Period Projects have a full understanding of doors for every period and will work with you to create bespoke doors for your project that meet all Fire and Safety Certification requirements.

Doors can be the easiest way to spot the difference between good traditional design and bad. The most important factors to get right are the proportions and detailing, followed by the colour, the opening mechanism and finally, the material used. Authentic looking period doors are available in reclaimed pine timber or new timbers.

Victorians used to set their windows and doors back somewhat. Although this can add to masonry costs, it looks far better than a cheap-look brick facade with doors that are just stuck on to the face of the wall. Another benefit of setting doors back is that they will be less prone to weathering and should therefore last significantly longer than those that are exposed.

Off-the-shelf timber doors are the cheapest option, but they can be susceptible to twisting and warping. They also just do not have the same solid look or traditional dimensions applied to the rails for authenticity. Hardwoods are less prone to these problems.

Doors, windows and ironwork were all painted in the same colours and, until the Edwardian era, all paint was either matt or semi-gloss. Late Georgian front doors were black or occasionally dark green and in the late 18th century bright blue was also seen. Victorian doors were normally painted green or grained and up until the end of the 1860s other colours were also used, such as dark blue, chocolate brown, deep red and olive green. The Queen Anne period saw the use of dark green or white.

Architectural Periods

It is important to understand the details of the various architectural periods, particularly for those most commonly emulated. Mixing and matching architectural features from various eras may well result in failure.

  • 1702-1714 – Queen Anne
  • 1714-1727 – Early Georgian
  • 1727-1760 – Georgian
  • 1760-1812 – Late Georgian
  • 1812-1820 – Regency
  • 1820-1830 – Late Regency
  • 1837-1860 – Early Victorian
  • 1860-1901 – Late Victorian
  • 1901-1910 – Edwardian (The Edwardian era loosely covers 1900- 1918)


Other periods are:

  • Gothic Revival – c1750-1900s
  • Neoclassical – 1750s-1830s
  • Greek Revival – c1819-1840s

Parquet Flooring – Call in the experts or else!

Sanding parquet flooring is different from ordinary floor sanding. The reason being that when sanding, you should always go with the grain. Of course with parquet – this is quite impossible! We have been sanding Parquet floors for over 20 years – and we are true experts. Whilst many people attempt to sand their own floors, there is a real technique required to get excellent results.
 

How do we sand Parquet Flooring?

We sand it at a 45 degrees angle to the grain.

First of all, we make sure all wood blocks are stuck down solid and remove all staples, nails and metal objects from the floor.

Once the floor is solid we start floor sanding. We use the best and newest equipment which is completely dust free.

We remove any deep scratches first and we level the edges.

Next we fill the gaps in the blocks from the sanding process, by mixing filler and dust to make a paste.

Now it’s time for the final pass with the belt floor sander. Then we sand all of the corners down that the edger floor sander was unable to reach.

Once the parquet floor is all sanded we buff it – with much time and care paid at this stage. This brings out any imperfections.

Once the floor is smooth and any scratches removed we give the floor a good hoover and damp mop, so it is ready for the seal.

Finally, it’s time to start sealing the floor and all our work comes to life. We use a short pile roller and roller the prime on to the floor. We use 1 coat of prime on a bare floor followed by 2 coats of polyurethane wood floor sealer – sometimes three coats if it is a high traffic area or there will be a large amount of pet traffic. We make sure to let each coat dry properly before applying the next and make sure to buff the floor too.

Give us a call 02380 570666 or fill in our enquiry form for a quote.

Rio Olympics – showing off nature and sustainability – close to our heart!

The Rio Olympics have revealed sustainability is at the heart of everything they are doing. Of course, we here at Period projects applaud this and in everything we make and do this has been a priority of ours. We have long been Green and environmentally aware and hope to see even more awareness raised by Rio. Here are some interesting facts.

Brazilian Mint unveiled Medals for the Olympic Games bearing a design that celebrate the relationship between the strengths of Olympic heroes and the forces of nature, the 500g gold, silver and bronze medals have been made with sustainability at their heart.

The athletes who top the podium in Rio will receive medals made from gold that has been extracted without the use of mercury and which was produced according to strict sustainability criteria, from the initial mining all the way through to the design of the end product.

The silver and bronze medals have been produced using 30 per cent recycled materials.

Even half of the plastic in the ribbons which will be used to hang the medals around athletes’ necks comes from recycled plastic bottles.

The designs feature laurel leaves – a symbol of victory in ancient Greece, in the form of the wreaths awarded to competition winners – surrounding the Rio 2016 Olympic logo. The laurel leaves represent the link between the force of nature and Olympians.

And who knew this? The other side has an image of Nike (Yes, like the brand) who is the Greek goddess of victory with the Panathenaic Stadium and the Acropolis in the background.

The Paralympic Games medals feature a special innovation and have a tiny device inside which makes a noise when the medal is shaken, allowing visually impaired athletes to know if they are gold, silver or bronze (gold has the loudest noise, bronze the quietest).

Also revealed at the event on Tuesday (14 June) at the Arena, were the podiums, which are made from organic materials and celebrate the tropical nature of Brazil. These are made entirely from Wood.

Amazing ideas innovation and of course with sustainability at the heart – we are so excited by this and look forward to the event – GO GB!!

Wood Floor Filling – Introducing the Pine Sliver

Natural wooden floors are just beautiful, aren’t they? We particularly love reclaimed boards.

With the variety of grains that show nature at its finest through the wood, this is something not available in mass-produced floors.

The only problem with natural wood flooring is that modern heating and house movement causes floor boards to retract and expand, causing natural shrinkage and leaving gaps between each board. These collect dust and hair – an issue for those who clean the house. Gaps in floorboards can also result in drafts and creaking.

We realised there was a need to be able to fill these gaps quickly and easily and yet retain the original charm of the floor. Period Projects have a solution. We’ve created the “SLIVER” which is used to fill the gaps, helping to prevent dust build up and giving you the chance to create a professional-looking floor with minimal fuss. What’s more, if you have pipes under the floor boards, or squeaky boards, rather than nailing it you can put a SLIVER in.
 

Specialist Wood Floor Filling

The majority of fillers start to shrink, change colour and fall out. We recommend using our highest quality sourced wood SLIVER. It will give your floor that ultimate professional finish. It quickly and easily fills unsightly gaps in between wooden boards with wedges of old reclaimed floorboard.

Our unique way to fill is to use a wedge of reclaimed pine that fills gaps, prevents dust and takes applications of varnish or water-borne sealer finish (which keep floors their natural colour). So you can fill gaps quickly and easily, with minimal fuss.